We are aware of that surface roughness means a lot in manufacturing industry. When the concept is recalled to your mind, there must be some common textures on machined parts, such as bright mirror surface, matte, and dull polish. They are what different surface roughness embodies in macroscopic condition.
Definition of surface roughness
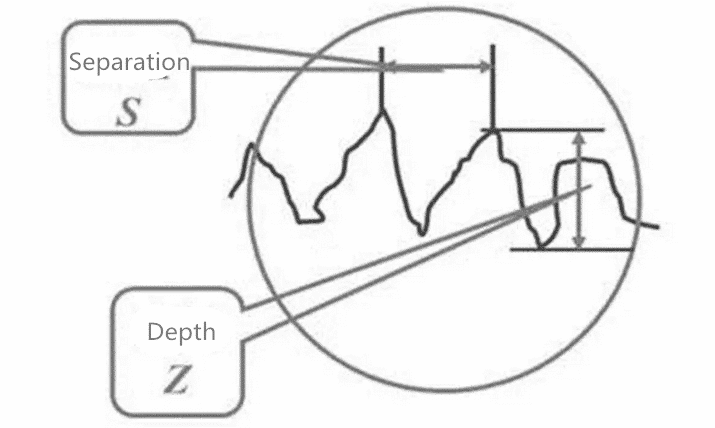
As is known to us, asperity of a part’s surface can be profiled as a series of jagged valleys in which there are crest, through, and spacing between them.
As a concept describing surface’s microscopic structure, surface roughness in fact is the length S between these crests(or troughs, usually below 1mm) and depth Z from trough to crest shown in the following diagram.
In general, we differentiate varying surface condition according to the range of S.
S<1mm, the asperity is regarded as surface roughness,
1≤S≤10mm, it’s regarded as waviness,
S>10mm, it’s called as geometric unevenness.
3 standards and their comparison table
In China, the standards measuring surface roughness by the 3 Indexes, (unit:mm)which are average arithmetic deviation of contour Ra, average height of unevenness Rz, and the maximum depth of the valley Ry.
In most of actual production activities, Ra is mostly applied. While in Japan Ry gets mostly used, referred as Rmax. People in European region use VDI 3400. We’ve made a comparison table of the 3 standards shown as below,
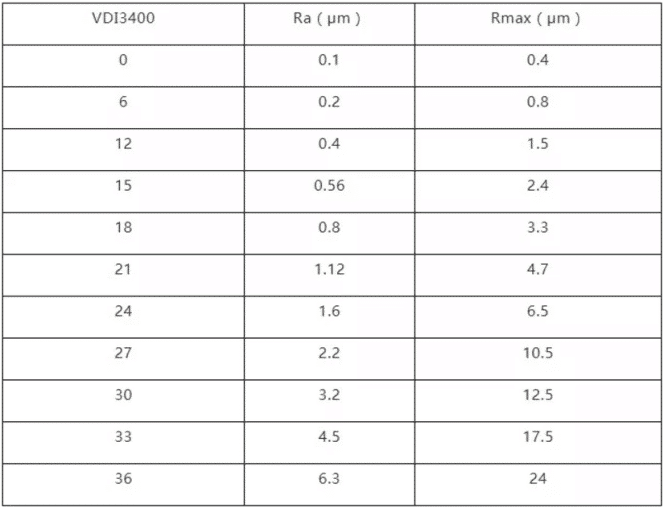
Diagram 2. The comparison between Ra, Rmax,and VDI3400.
Formation factors of surface roughness
Surface roughness is generally formed by processing methods and other factors, such as friction between tool and part surface, plastic deformation of surface metal when chips are separated, high frequency vibration in process system, discharge pits in electrical machining, etc. Because of the difference of processing method and workpiece material, the depth, density, shape and texture of the traces left on the machined surface are different.
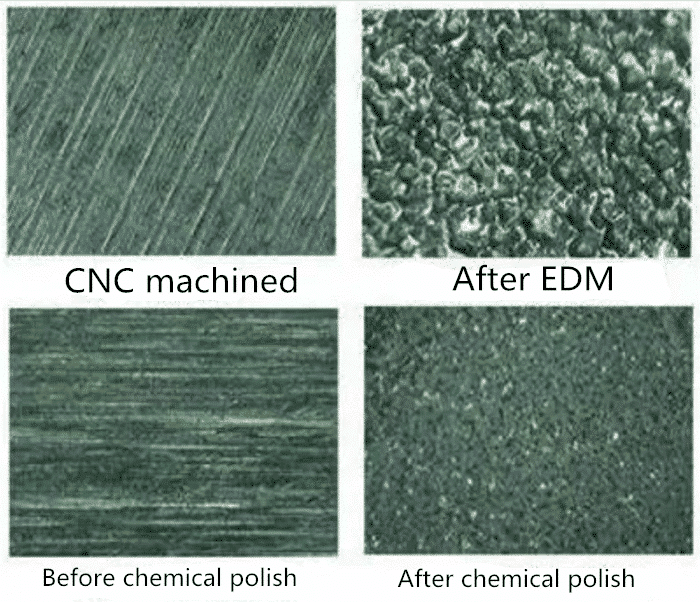
The Main Effect of Surface Roughness on Parts
Affect wear resistance.
The rougher the surface, the smaller the effective contact area between the surfaces, the greater the pressure, the greater the friction resistance and the faster the wear.
Affect the stability of coordination.
For clearance fit, the rougher the surface is, the easier the wear and tear will be, and the clearance will increase gradually in the working process. For interference fit, the actual effective interference will be reduced and the connection strength will be reduced because of the extrusion of micro-convex peaks during assembly.
The fatigue strength is affected.
There are large troughs on the surface of rough parts. Like sharp notches and cracks, they are sensitive to stress concentration, which affects the fatigue strength of parts.
Influencing corrosion resistance.
Rough parts surface, easy to make corrosive gases or liquids through the surface of the micro-valley infiltration into the metal inner layer, resulting in surface corrosion.
Influencing sealing
Rough surfaces do not fit tightly, and gases or liquids leak through cracks between contact surfaces.
The contact stiffness is affected
Contact stiffness is the ability of parts to resist contact deformation under external force. The stiffness of the machine depends to a great extent on the contact stiffness between the parts.
The measurement accuracy is affected
The surface roughness of measured parts and measuring tools will directly affect the accuracy of measurement, especially in precision measurement.
In addition, surface roughness has different effects on coating, thermal conductivity and contact resistance, reflectivity and radiation performance, resistance of liquid and gas flow, and current flow on conductor surface.
Evaluation Basis of Surface Roughness
Sampling Length
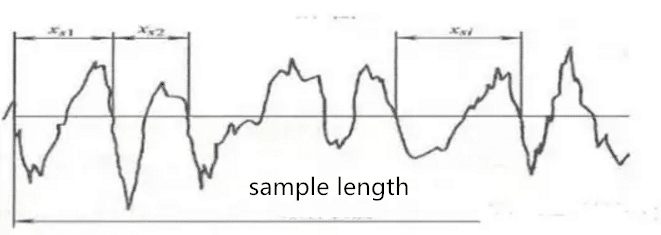
Sampling length is a reference line length for evaluating the age of surface roughness. According to the formation and texture characteristics of the actual surface of the part, the length of the section reflecting the surface roughness characteristics should be selected, and the sampling length should be measured according to the total direction of the actual surface profile. Sampling length is defined and selected to limit and reduce the influence of surface waviness and shape error on the measurement results of surface roughness.
Assessment length
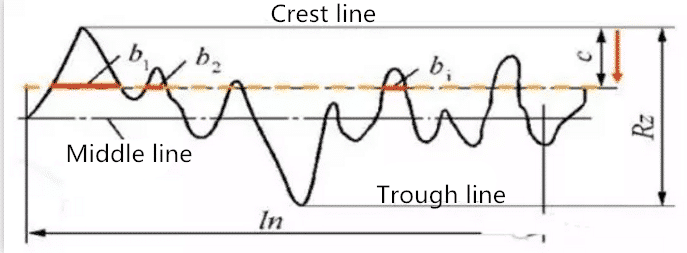
Assessment length is a necessary length for assessing contour. It may include one or more sampling lengths. Because the surface roughness of each part of the part surface is not necessarily uniform, it is often unreasonable to reflect the characteristics of a certain surface roughness on a sampling length, so it is necessary to take several sampling lengths on the surface to evaluate the surface roughness. Assessment length generally includes five sampling lengths.
datum line
The datum line is the contour midline used to evaluate the surface roughness parameters. There are two kinds of datum lines: the least squares midline of the contour: within the sampling length, the sum of the outline offset of each point on the contour line is the smallest, and it has a geometric contour shape. Arithmetic mean midline of contour: Within sampling length, the area of contour on both sides of the midline is equal. In theory, the least squares midline is an ideal datum line, but it is difficult to obtain in practical application. Therefore, the arithmetic average midline of contour is generally used to replace it, and a line with approximate position can be used to replace it in measurement.
Surface roughness evaluation parameters
Height characteristic parameters
Ra contour arithmetic mean deviation: the arithmetic mean of the absolute value of contour offset within the sampling length (lr). In practical measurement, the more the number of measuring points, the more accurate Ra is.
Maximum height of Rz contour: the distance between the top line of contour peak and the bottom line of valley.
Ra is preferred in the range of commonly used amplitude parameters. Before 2006, another evaluation parameter in the national standard was “10-point height of micro-roughness” expressed by Rz and maximum height of contour expressed by Ry. After 2006, 10-point height of micro-roughness was cancelled in the national standard and maximum height of contour expressed by Rz.
Spacing characteristic parameters
The average width of the RSM contour unit. Within the sampling length, the average distance of contour micro-roughness. Microscopic irregularity spacing refers to the length of contour peaks and adjacent contour valleys on the midline. In the case of the same Ra value, the Rsm value is not necessarily the same, so the reflected texture will be different. The surface that pays attention to the texture usually pays attention to the two indicators of Ra and Rsm.
The shape characteristic parameters of Rmr are expressed by the length ratio of the contour support, which is the ratio of the length of the contour support to the sampling length. The length of the contour support is the sum of the sectional lengths of each section within the sampling length, parallel to the midline and intersected with the contour peak line C.
Surface Roughness Measurement Method
comparison method
It is used in the field measurement of workshop, and it is often used in the measurement of medium or rough surface. The method is to determine the measured surface roughness value by comparing the measured surface with a certain number of roughness samples.
touch needle method
The surface roughness is slowly sliding along the measured surface with a diamond stylus whose radius of curvature is about 2 micron. The displacement of the diamond stylus is converted from an electrical length sensor to an electrical signal. After amplification, filtering and calculation, the surface roughness value is indicated by a display instrument. The profile curve of the measured section can also be recorded by a recorder.
Generally speaking, the measuring tool which can only display the surface roughness value is called the surface roughness measuring instrument, and the surface roughness profiler which can record the surface profile curve is called the surface roughness profiler. These two measuring tools have electronic calculating circuit or computer. They can automatically calculate the arithmetic mean deviation Ra of contour, the 10-point height Rz of micro-roughness, the maximum height Ry of contour and other evaluation parameters. They have high measuring efficiency and are suitable for measuring the surface roughness of Ra ranging from 0.025 to 6.3 um.
