Le concept de courbe limite de fatigue (HL) a été proposé pour la première fois lors de la résolution de la courbe limite de fatigue de l'essieu arrière.
On January 10, 1954, a comet of BOAC disintegrated 7800 meters above Elba, Italy.
On April 8, another “comet” of BOAC crashed into the bay of Naples, Italy, killing 21 people on board. So far, all comets have been grounded.
The frequent fall of comets shocked the world. ?
At that time, British Prime Minister Winston Churchill ordered us to find out the cause of the accident at all costs.
To this end, the British Navy sent out a fleet to salvage the wreckage of the plane near Elba Island from the bottom of the sea hundreds of meters deep, and sent it to the Royal Aircraft Research Institute for investigation.
The investigation found that there were cracks in the lungs of the air crash victims caused by gas expansion, indicating that the sudden decrease of air pressure in the cabin before the crash led to the rapid expansion of gas in the lungs, which led to the rupture of the lungs. Research on the wreckage of the plane showed that cracks appeared in some portholes, which was consistent with the autopsy findings.
At the same time, de havilan company carried out strict inspection on the aircraft under production and grounded. The test lasted more than 9000 hours, and cracks appeared on the aircraft skin, just like the cracks on the wreckage of the crashed aircraft.
According to the research and analysis of the technicians, the accident was caused by the “fatigue” of the metal materials used to make the aircraft body structure.
Under the action of alternating pressure, after a period of time, micro cracks are formed in the local high stress area, and then the micro cracks are gradually extended to fracture.
Fatigue failure has the characteristics of sudden in time, local in location and sensitivity to environment and defects, so it is not easy to be found in time.
Under the impact of repeated pressurization and decompression, the skin at the square porthole of comet aircraft deforms and cracks, which eventually leads to metal fatigue fracture. As the first kind of jetliner in the world, “comet” flies faster than other jetliners, and naturally bears more pressure, which makes it easier to cause metal fatigue.
Thus, through the investigation of the comet accident, a new subject – “fatigue mechanics” was born.
Today we will be familiar with and understand about: fatigue curve and basic fatigue mechanical properties.
Fatigue curve and symmetrical cycle fatigue curve
(1) Fatigue curve and fatigue limit
Fatigue curve: it is the relationship curve between fatigue stress and fatigue life, i.e. S-N curve, which is the basis for determining fatigue limit and establishing fatigue stress criterion.
For metal materials with strain aging, such as carbon steel and ductile iron, when the cyclic stress level drops to a certain critical value, the low stress section becomes a horizontal section, which indicates that the specimen can undergo infinite stress cycles without fatigue fracture. Therefore, the corresponding stress is called fatigue limit, which is denoted as σ – 1 (symmetric cycle, r = – 1).
If this kind of material does not fracture after 107 stress cycles, it can be considered that it will not fracture even if it is subjected to infinite stress cycles, so 107 cycles is often used as the base for determining the fatigue limit.
Another kind of metal materials, such as aluminum alloy and stainless steel, has no horizontal part in S-N curve, but increases with the decrease of stress. At this time, the stress without fracture in a certain cycle can only be defined as the conditional fatigue limit, or finite life fatigue limit, according to the service requirements of materials.
(2) Determination of fatigue curve
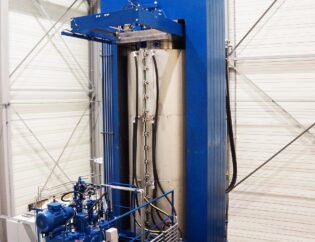
Generally, the fatigue curve is measured by rotating bending fatigue test. The principle of four point bending test machine is shown in the figure below.
The high stress (finite life) part of S-N curve was measured by group test method, that is, the higher stress level of 3-4 was taken, and the data of about 5 samples were measured under each stress level, and then the data was processed to calculate the median (survival rate 50%) fatigue life.
The median S-N curve with a survival rate of 50% can be obtained by using the σ – 1 measured by the ascending and descending method as the lowest stress level point of the S-N curve and fitting it with the results measured by the group test method into a straight line or curve.
(3) Fatigue limit under different stress states
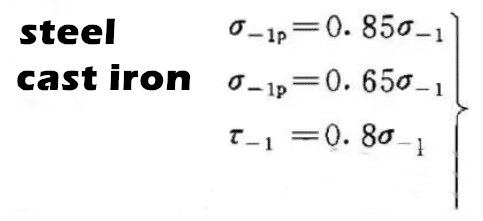
The fatigue limit of the same material is different under different stress states, but there is a certain relationship between them.
The results show that there is a certain relationship between symmetrical bending fatigue limit and symmetrical tension compression and torsion fatigue limit.
(4) Relationship between fatigue limit and static strength
The test shows that the greater the tensile strength of metal material, the greater the fatigue limit.
For medium and low strength steels, there is a linear relationship between fatigue limit and tensile strength.
When σ B is low, it can be approximately written as σ – 1 = σ B.
When σ B is higher, the near linear relationship will deviate, which is due to the decrease of plasticity and fracture toughness and the easy formation and propagation of cracks.
Fatigue diagram and asymmetrical cyclic fatigue limit
Many parts work under asymmetric cyclic load, so it is necessary to measure the asymmetric cyclic fatigue limit of materials to meet the needs of design and material selection of such parts.
The fatigue limits of various asymmetrical cycles are usually obtained from the fatigue diagram by engineering drawing method.
According to different drawing methods, there are two kinds of fatigue diagrams
(1) σ a – σ m fatigue diagram
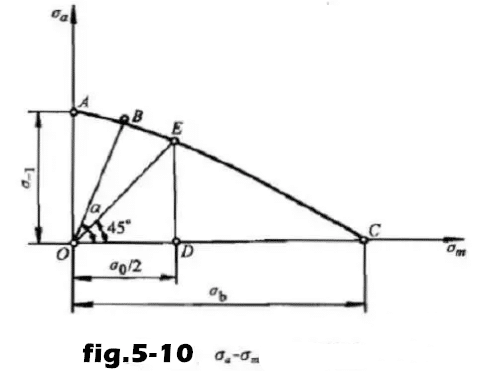
Under the condition of different stress ratio R, the fatigue limit σ r expressed by σ Max is decomposed into σ A and σ m, and the fatigue diagram of σ a – σ m is obtained by making ABC curve in the coordinate system.
(2) σ max (σ min) – σ m fatigue diagram
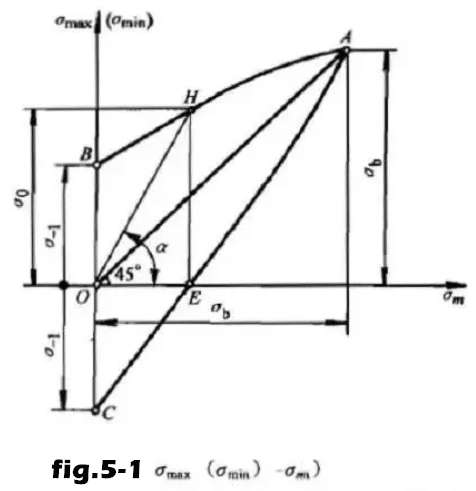
The fatigue limit under different stress ratio R is expressed by σ max (σ min) and σ m respectively in the coordinate system to form the fatigue diagram.
AHB is the fatigue limit σ Max under different R.
The fatigue limit increases with the increase of average stress or stress ratio, but the stress amplitude a decreases.
Fatigue overload resistance
The original fatigue limit of the material may not change or decrease when the metal parts are subjected to short-term overload occasionally, which depends on the overload stress of the material and the corresponding cumulative overload cycles.
If the metal runs for a certain number of cycles at a stress level higher than the fatigue limit, its fatigue limit and fatigue life will decrease, which will cause overload damage.
The ability of metal material to resist fatigue overload damage is expressed by overload damage boundary or overload damage area.
The overload damage boundary is determined by experiments: different overload stress levels and corresponding stress cycles that begin to reduce fatigue life are measured, and different test points are obtained. The overload damage boundary is obtained by connecting each point. The two queries are not favorable
The shadow line area between the overload damage boundary and the straight line section of the high stress area of the fatigue curve (the stress cycle of fatigue fracture under each stress level of this section is called the overload endurance value) is called the overload damage area.
When the parts are overloaded in this area, the fatigue limit of the material will be reduced in varying degrees, and the more the fatigue limit is reduced near the endurance value.
The steeper the overload damage boundary (or overload endurance value) is and the narrower the damage area is, the stronger the ability of resisting fatigue overload is.
Fatigue notch sensitivity
Due to the need of use, parts often have steps, corners, keyways, oil holes, threads and so on. These structures are similar to notch effect, which will change the stress state and cause stress concentration.
So it is important to understand the effect of stress concentration caused by notch on fatigue limit.
There are two extreme cases when evaluating materials according to fatigue notch sensitivity
(a) KF = KT, that is to say, the stress distribution of notched specimen is exactly the same as that of elastic state, and there is no stress redistribution. At this time, the notch reduces the fatigue limit most seriously, and the fatigue notch sensitivity QF = 1, and the notch sensitivity of material is the largest.
(b) KF = 1, σ – 1 = σ – 1n, the notch does not reduce the fatigue limit, which indicates that the stress has a great redistribution in the fatigue process, the stress concentration effect is completely eliminated, QF = 0, the notch sensitivity of the material is the smallest.
Therefore, QF value can reflect the ability of material to redistribute stress and reduce stress concentration during fatigue.
High cycle fatigue: most metals are very sensitive to notches; ears are broken
In low cycle fatigue, most metals are not sensitive to notch, because the notch root area of the latter is in the plastic zone, resulting in stress relaxation and stress concentration reduction.
